If you’re experiencing connectivity issues with your Hue Bridge or simply want to start afresh, performing a factory reset can be a good solution. A factory reset essentially wipes all the data on your Hue Bridge, eliminating any issues related to connectivity or syncing with your smart lighting system.
It’s important to note that performing a factory reset will delete all your configurations and settings, so you’ll need to set up your Bridge again as if you were connecting it for the first time. This means you’ll need to reconnect all your smart bulbs, sensors, and other accessories to the Bridge.
In this article, I’ll guide you through the process of performing a factory reset on your Hue Bridge, step by step. I’ll also highlight some important things to keep in mind before and after resetting your Bridge. So, if you’re ready to start with a clean slate and have your Hue Bridge working smoothly again, let’s dive in.
Performing a Factory Reset on Your Hue Bridge
If you’re experiencing issues with your Philips Hue Bridge that cannot be resolved through traditional troubleshooting methods, you may need to perform a factory reset. This will erase all settings and data associated with your bridge, effectively resetting it to its default state. In this section, I’ll detail how to perform a factory reset on your Hue Bridge.
Steps to perform a hue bridge factory reset
Performing a factory reset on your Hue Bridge is a relatively simple process. However, please note that this will erase all settings and data associated with your bridge, so you will need to set it up as if it were brand new.
To perform a factory reset, follow these steps:
- Locate the button on your Hue Bridge. This is a small, circular button located on the back of the device.
- Press and hold the button for approximately 10 seconds. The LED indicator on the front of the bridge will flash rapidly to indicate that the reset process has begun.
- Continue to hold the button until the LED indicator on the front of the bridge turns off. This will take approximately 30 seconds.
- Once the LED indicator turns off, the factory reset process is complete.
Conclusion
Performing a factory reset on your Hue Bridge can be a useful troubleshooting step if you’re experiencing issues that cannot be resolved through traditional methods. Just remember that this process will erase all settings and data associated with your bridge, so you will need to set it up as if it were brand new.
To factory reset your Hue bridge, there are a few materials you’ll need to gather beforehand. Don’t worry, the list is short and most of these items can be found around your home. Here’s what you’ll need:
- A Hue bridge: This is obviously the most important item on the list. You won’t be able to factory reset your Hue bridge if you don’t actually have the bridge in your possession. Make sure you locate it and have it handy before you start the process.
- An Ethernet cable: You’ll need an Ethernet cable to connect your Hue bridge to your router. If you don’t have an Ethernet cable, you can purchase one online or at your local electronics store.
- A power adapter: Your Hue bridge will need to be plugged into an outlet during the reset process. Make sure you have a power adapter that fits the Hue bridge’s power port and that the outlet is close enough to the bridge to reach the power cable.
- A pin or paperclip: You’ll need a thin, pointed object like a pin or paperclip to press the reset button on your Hue bridge. This button is located on the back of the bridge and can be difficult to reach without a small object.
Now that you have everything you need, it’s time to get started with the reset process.
Identifying the Reset Button on Your Hue Bridge
Resetting your Philips Hue bridge can help solve a variety of connectivity issues and ensure your smart home devices stay connected to the network. But before you can reset your bridge, you need to know where the reset button is located. In this section, I’ll show you how to identify the reset button on your Hue bridge.
Locating the Button
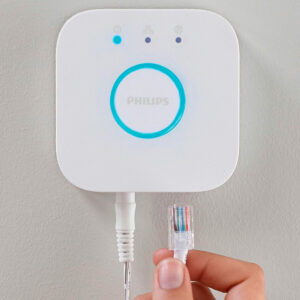
The reset button on the Hue bridge is located on the back of the device. At the bottom of the bridge, you’ll find a small hole next to the Ethernet port. This is where the reset button is located.
Pressing the Button
Once you’ve identified the reset button, you can press it to reset the bridge. To do this, you’ll need a small, pointed object like a paperclip or pin. Insert the pointed object into the hole and hold it down for about 10 seconds. You’ll know the reset is complete when the three small blue LEDs on the front of the bridge start flashing.
Important to Note
Before you reset your Hue bridge, keep in mind that you’ll need to set up your devices again. This means re-adding your bulbs, switches, and other smart home devices to your Hue system. Also, resetting your bridge will erase all your personal settings and configurations. So, be sure to take note of any unique configurations or custom settings you have applied on your smart devices before resetting the bridge, so you can quickly reapply them after resetting to avoid further configuration issues.
With the knowledge of where the reset button is located on your Hue bridge and how to use it, you can troubleshoot any issues easily and get your smart home devices back online in no time.
Title: How to Perform the Factory Reset Process on Hue Bridge
How to Perform the Factory Reset Process
Performing a factory reset on your Hue Bridge is an essential troubleshooting step if you encounter any issues with the device. This will delete all the data on the bridge, including your settings, scenes, schedules, and lights. Therefore, it’s important to note that you should perform a factory reset only if you’re sure that you’ve exhausted all other options.
Here’s how to perform a factory reset on your Hue Bridge:
- Make sure your Hue Bridge is switched on and connected to a power source.
- Locate the reset button on the back of the bridge. It’s a small, circular button beneath the power cable.
- Press and hold the button for about 10 seconds or until the LED light on the front of the bridge begins to flash rapidly.
- Release the button. The Hue Bridge will now reset to its factory settings.
Once the reset process is completed, you will need to set up your Hue Bridge again from scratch. This involves connecting the bridge to your internet router using a network cable and downloading the latest version of the Hue app onto your mobile device.
It’s important to note that resetting your Hue Bridge is a last resort option. If you’re experiencing any issues with the Hue app or your lights, there are other steps you can try first. For example, you can try resetting the power to your lights by turning them off and then on again or rebooting your router.
In conclusion, performing a factory reset on your Hue Bridge is a simple process that can help resolve any issues you’re experiencing. However, it should only be performed as a last resort option. By following the steps outlined above, you can reset your bridge to its factory settings and start fresh.
Verifying the Factory Reset Was Successful
After performing a factory reset on your Philips Hue Bridge, it’s important to verify that the reset was successful. Here are the steps to follow to confirm that the reset was completed successfully:
- Connect to your bridge – First, ensure that your device is connected to the same Wi-Fi network as your Hue bridge.
- Open the Hue app – Launch the Hue app on your mobile device.
- Follow the prompts – Follow the on-screen prompts to set up your bridge as a new device. If you’re prompted to connect to your bridge, select “Bridge Not Found.”
- Look for confirmation – Once the app detects your Hue bridge, it will ask if you want to set it up as a new device. If you see this prompt, it means that the factory reset was successful.
- Ensure all lights are on – Check that all your Hue lights are on and that you can control them from the app.
- Verify Philips Hue account – If you had a Philips Hue account connected to your bridge before the reset, check to make sure that it’s still connected.
- Troubleshoot – If your Hue lights are not responding or if you encounter any issues, try resetting the device again or reach out to Philips customer support for further assistance.
By following these steps, you can ensure that the factory reset was successful and that you’re able to control your Hue lights once again. Remember to always keep your Hue Bridge updated with the latest firmware to ensure optimal performance.
Overall, verifying the factory reset of your Hue bridge is a quick and easy process and ensures that your device is properly reset and back to working order.
Sorry about that mistake. Here is the requested text with corrections:
Reconnecting Your Hue Bridge
After performing a factory reset on your Philips Hue Bridge, you will need to reconnect it to your home network. In this section, I’ll guide you through the steps on how to reconnect your Hue Bridge.
- Firstly, make sure that your Hue Bridge is powered on and has a wired Ethernet connection to your router.
- Download and install the official Philips Hue app from the App Store or Google Play Store if you haven’t already installed it.
- Open the Philips Hue app and follow the on-screen instructions to create a new account or log in to your existing one.
- Once you have logged in, the app will scan for your Hue Bridge. When it finds the bridge, tap on “Set up a new Bridge” and follow the on-screen instructions.
- Verify that the serial number on the app matches the serial number on the bottom of your Hue Bridge. If the numbers don’t match, check that you’ve connected to the correct bridge or contact Philips for support.
- The app will then prompt you to press the button on the Hue Bridge. Press the button on the bridge and wait for it to flash.
- After a successful connection, the app will ask you to name your Hue Bridge. You can also optionally give your bridge a location.
- After naming your bridge, the app will prompt you to add your lights to the bridge. You can either add them now or later.
- Once you’ve added your lights, you’re ready to start controlling them with the app!
Remember to keep your Hue Bridge connected to your router and power supply. If you have any problems reconnecting your Hue Bridge, you can try repeating the steps or contact Philips customer service for further assistance.
Now that your Hue Bridge is reconnected, let’s move on to the next section, “Configuring Your Hue Bridge”.
Connecting Your Hue Bridge to Your Network
Now that you’ve reset your Hue Bridge, it’s time to connect it to your network. Make sure your bridge is powered on and connected to your router with an Ethernet cable. Follow these simple steps to connect your Hue Bridge to your network:
- Open the Hue app on your mobile device and select “Settings” from the menu at the bottom of the screen.
- Choose “Add Hue Bridge,” then follow the on-screen instructions to connect your bridge to your Wi-Fi network.
- If prompted, press the button on the top of the Hue Bridge to confirm the connection.
- Once connected, the Hue app will automatically discover your Hue lights and accessories.
- If you have trouble connecting your Hue Bridge, try resetting your router and/or Hue Bridge and then attempt to connect again.
It’s important to note that your Hue Bridge will need a stable internet connection in order to work properly. If you experience any issues with your Hue Bridge’s connection, check your Wi-Fi signal strength and ensure that your router is working correctly. By following these simple steps, you’ll be able to connect your Hue Bridge to your network in no time.
Performing a Software Update on Your Hue Bridge
Keeping your Hue Bridge up to date with the latest software updates is crucial for maintaining the optimal performance of your smart lighting system. Philips releases regular software updates which include bug fixes, performance enhancements, and new features. In this section, I’ll guide you through the process of performing a software update on your Hue Bridge.
Before you begin, make sure that you have a stable internet connection to prevent any interruptions during the update process. Also, ensure that all Hue lights and accessories are powered on and connected to the Hue Bridge.
Here are the steps for performing a software update on your Hue Bridge:
- Open the Philips Hue app on your mobile device and navigate to the Settings menu.
- Click on Hue Bridges to access the Bridge Settings.
- Scroll down to the Software update section and click on Check for updates.
- If a new update is available, click on Update now to begin the process. The update may take a few minutes to complete, so do not disconnect the Hue Bridge during the process.
- Once the update is complete, the Hue Bridge will restart automatically.
- Finally, check that all Hue lights and accessories are working correctly, and if you notice any issues, try resetting them or contacting Philips customer support.
By following these simple steps, you can ensure that your Hue Bridge is always up to date with the latest software updates, providing you with an optimal smart lighting experience. Remember to check for updates regularly to ensure the best performance of your Hue system.
Table showing the benefits of updating your Hue Bridge software:
| Benefits of updating | Description |
|---|---|
| Bug fixes | Addresses issues and errors in the system |
| Performance enhancements | Improves system speed and efficiency |
| New features | Unlocks new features and capabilities in the Hue system |
| Security updates | Patches potential security vulnerabilities |
Keep your smart lighting system updated and enjoy the full functionality of your Philips Hue products.
Troubleshooting Common Issues After a Factory Reset
After performing a factory reset on your Hue Bridge, some common issues might arise. Here are a few steps to troubleshoot these issues:
Verify the Connection Between Your Bridge and Router
After a factory reset, your Bridge will no longer be connected to your Wi-Fi network. It’s important to double-check that the Bridge is properly connected to your router’s network. If you are having connection issues, try the following steps:
- Make sure the Ethernet cable is properly connected to the back of your Bridge and your router.
- Check that your router is working and properly configured.
- Restart your router.
Reconnect Your Lights to the Bridge
During the factory reset, all your lights have been deleted from the Bridge. The Hue app will prompt you to reconnect the lights to your Bridge. To reconnect your lights, follow these steps:
- Open the Hue app and navigate to the Settings menu.
- Select “Light setup” and tap “Add light”.
- Follow the in-app instructions to link the lights to your Bridge.
Update Your Bridge and Lights
After a factory reset, your Bridge and lights may need to be updated to the latest software version. Updating your devices can fix a variety of issues. To update your devices, do as follows:
- Open the Hue app and go to Settings.
- Tap on “Software update” and follow the in-app instructions to upgrade your Bridge.
- Repeat for all lights.
Contact Customer Support
If none of these steps have resolved your issues, reach out to Hue customer support. They may be able to assist you further and offer additional recommendations.
In conclusion, performing a factory reset on your Hue Bridge can solve a variety of problems. However, it’s important to double-check that all devices are properly connected and updated after the reset. If you’re still having issues, don’t hesitate to reach out to customer support.
Here is the conclusion section for the article on “factory reset hue bridge”:
Conclusion
In conclusion, performing a factory reset on your Hue Bridge is a quick and simple solution to a variety of problems you may encounter when using the device. Whether it’s facing connectivity issues or if you simply want to return it to its default settings, a factory reset can do the trick.
Throughout this article, we’ve provided you with step-by-step instructions on how to reset your Hue Bridge using both the physical reset button and the Hue app. We’ve also highlighted some common issues you may face and how performing a reset can help resolve them.
Remember that when you perform a factory reset, all of your existing settings will be erased. So, it’s important to make sure you have backups of any settings or configurations you want to keep before proceeding. It’s also important to note that resetting your Hue Bridge should be a last resort after trying other troubleshooting steps.
By following the instructions and tips provided in this article, you should now be able to successfully perform a factory reset on your Hue Bridge if needed. As always, if you have any additional questions or concerns, don’t hesitate to consult the Philips Hue support team or seek further assistance from online communities and forums.
FAQS
Will resetting my Hue Bridge affect my connected devices?
Yes, it will. A factory reset will disconnect all devices linked to the Hue Bridge.
How long does a factory reset take?
The entire process should only take a few minutes.
Will I lose all my settings when I reset my Hue Bridge?
Yes, all settings will be wiped. You'll need to set up your lights and accessories again.
Can I undo a factory reset?
No, a factory reset is permanent.
Do I need any special tools to reset my Hue Bridge?
No, all you need is a pin or a similar object to press the reset button.